Mission:
The purpose of this web page is not to teach you how to draw. I will
not be going though the technique, perspective, color, line weight,
software, or any of the stuff you can easily surf up. This page
is to inform artists who want to draw steampunk machines but
don't quite understand how steam works. The focus is to
add enough elements to your drawings, to make your steampunk
machines more believable.
Validation:
I feel that too often,
steampunk
designs are too fancy. They go too cool and end up loosing the
all important look & feel of old tech steampunk. I think that it is
important
to state that I make real working steampunk machines / robots for
a hobby.
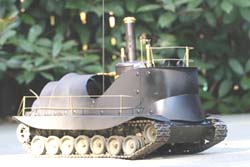
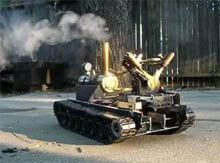
My steam site: Crabfu
SteamWorks,
contains lots of miniature, real
working, live - steam machines. There has been overwhelming media
coverage of my work,
probably because I took it from the fake sci-fi movie magic, into the
real world. Through
experience and
trial and error, I've learned not only to make something look like
it would work, but actually does work.
Disclaimer:
I am an animator and concept artist by trade. However, I don't think
my art is really so great that it deserves a "how to". My
devotion to my live steam hobby however, lends my steampunk designs a
level
of authenticity that often lacks in steampunk art. Therefore, this is
just a quick explanation of parts, and how to draw and design a machine
that
"looks" convincing.
Please keep in mind that these are super simple explanations of
different components of live steam, and steam buffs will probably will
tear
these descriptions to pieces :) I feel that it is
important to get the basic idea without having to go into dry and
boring detail. By no means am I an expert in steam engines. This info
is taken from my personal experience
working on small scale live-steam engines. Most of the
examples below are found on model engines, which works off of the same
basic
principle as the big ones. This is also just a
guide. There are no set rules for concept art. You just make
whatever appeals to you. In other words.... this
is steam for artists, not really to
educate you in details of steam power! :) However, it is
important to understand some fundamentals of steam power, in order to
make your drawings look believable, as something that could have been
built in Victorian times.
First you have to understand steam, and how it works by looking at each
part of the machine.
Steam
Power Components
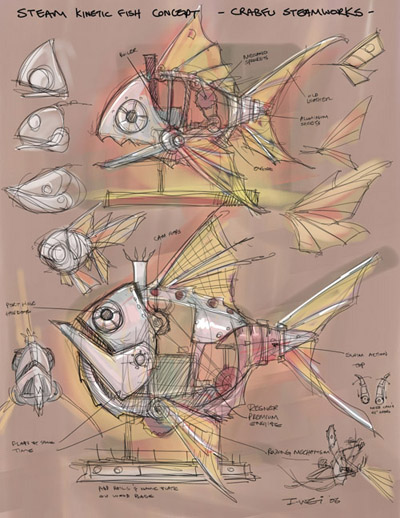
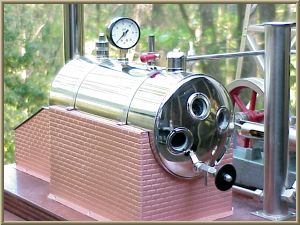
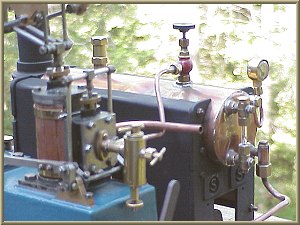
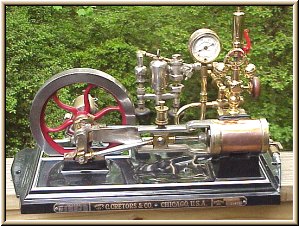
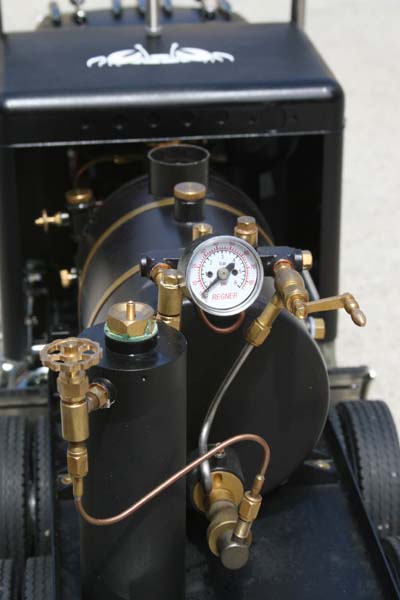
Boiler:
The boiler is
usually cylindrical and
long. The purpose of it is to boil water, pretty simple concept :) Most
boilers have flues, which just means inside is a bunch of tubes for the
fire to heat & boil the water fast. Sometimes they have a camel
dome
looking thing on top. Steam pipe should be drawn on top of the boiler,
where steam comes out. However, sometimes the steam pipe comes
out of the boiler, and get fed through the fire again, this is called
superheater. In this case, the steam pipe can come out elsewhere
visually. Anyway, to keep it simple, make pipes coming out of the
top of the boiler. The "smoke stack" usually comes out of the
boiler to one end. The
reason for the stack is to vent the fire, as one end of the boiler is
fired. Often steam exhaust from the
boiler goes into the stack, the force of the steam shooting out of it,
helps drawl the fire more inside the flues. Boilers usually have a
stack somewhere,
size and shape of the stack varies a lot.... another words, sketch
whatever shape and size stack looks best, to balance out the design.
Burner /
Fuel
Heat / Fire can be
generated in a
variety of ways. This usually evolves the fuel source being coal, gas,
or anything that can burn really hot. With coal, you need to design an
area which the coal
is fed into, with a door. You also need to design an area for
someone to fed the coal/wood, as well as a supply of coal /
tender. With
gas, you need to draw up some design of the burner mechanism, usually
sticks out of the burner a bit. The fuel supply for gas can be a
container, of any shape (although most everything is cylindrical), with
pipes going into the burner, connected to the bottom of the boiler. Gas
mixes with air in the process, and
the amount of fire can be controlled by valves on the gas tank, as well
as the amount of air is mixed for
the fire.
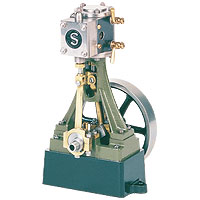
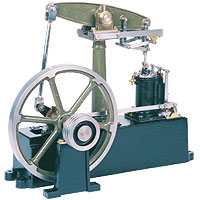
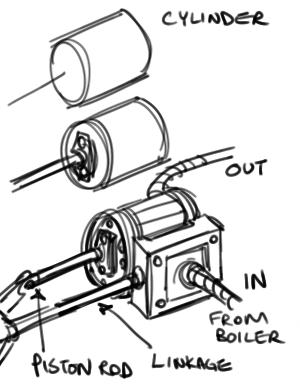
Engine
There are a variety of
different types
of steam engines. They basically are just pistons in which steam
pushes, and in a variety of ways via linkages, all end up with an axle
spinning in a circular motion.
Without going into
steam
engines in
detail, here are the basics of how to draw them. Draw a cylinder,
(piston is inside and not visible). Shapes is basically a big cylinder
with a small
long cylinder coming out of it. Steam is piped through the cylinder to
push
the piston in and out. If it is double
acting (pushes both in and out) then it usually contains a box like
shape on
the cylinder. This is for another link connected to the shaft to open
and close valves to allow the steam to fed though each end of the
cylinder - pushes piston out, and pushes in when it gets to the end of
the travel. So to put it simply, cylinder, with a box on the side.
Some steam engines can
be reversed.
There are three ways that this can work: 1) Engine can be reserved by
linkages to change how the steam is piped in by a Stephenson's linkage,
which usually looks like some sort of lever, complex looking linkages,
with
an arc piece that guides the lever. 2) For double cylinders, a valve
can reverse the direction of the steam flow, and therefore the engine
runs backwards. 3) clutch driven, the engines only runs in one
direction, but with the use of gears, the drive shaft can be reversed.
Flywheel
This is usually a large
heavy wheel, and it does have a purpose. The flywheel keeps
the momentum going, otherwise the engine runs sporadically and can
stall. Flywheels are always attached to the shaft that the pistons
drive. You don't absolutely need a flywheel, but it makes the engine
run a lot smoother.
Oiler/ displacement lubricator
These things are
just what it sounds like, they lubricate. They are usually attached, or
very close to the engine. They can be right on the cylinder area or on
the pipe going into the engine. They provide oil &
lubrication for the pistons inside of the cylinder. They can be
cylinder shaped container, or a manual hand pump.
None of this is all
that
important in
drawing steampunk machine, all you have to remember are these shapes:
Cylindrical for the cylinders (duh), boxes attached to cylinders with
pipe, levers & valves near the engines, and flywheel.
Governor
Cool looking device.... usually 2 spinning balls powered by the
main shaft of the engine. The purpose to control the amount of steam
going into the engine. Usually a pulley is attached from the engine
shaft to this device. When the engine spins
up, it spins the governor, and the centripetal force makes the balls
fly out. This action causes a mechanism to pull up a linkage, which
restricts the amount of steam that is piped into the engine. This
device is must be straight up in order to function properly, and
connected between the
engine shaft, and the steam inlet to the engine.
Condenser The condenser traps the oily steam
exhaust from the engine. Engine exhaust is fed into it, allowing oily
water to be trapped inside and condensed, only letting clean steam out.
The
steam exhaust from the condenser can then be fed into the main stack on
the
boiler, giving it that classic look - steam out of the main stack,
however, it can be fed into
any stack. This is not absolutely necessary component, but without it,
things could get quite messy and covered in oil. Anyway, another easy
part to draw, just another cylinder. Valves Valves are just cool,
especially when
there are lots of it. Hand operated valves controls a variety of
things, but basically it stops or lets steam through.
Safety
Valve:
This is just a safety
mechanism, so
when the pressure within the boiler gets too high, it will vent out
steam to prevent an boiler explosion. This is attached to the
boiler, up high as it needs to let steam out, not water :) It can be
vented to the stack.
Water
Sight
Glass
This is just a way for
you to see how
much water is in the boiler. If the boiler runs dry and still firing,
it will fail.
Sight glass can either be a window, or a glass tube.
Water
pump / tank
Water pumps and water
tanks are used to
pump water into the boiler while it is steaming. Pumps can be manual
hand
pumps, or connected to an engine (uses the power of the engine to pump
the water). It takes water from a reservoir, and
feed it into the boiler.... hopefully at the same rate that the engine
is using up, maintaining water level. This is not absolutely necessary,
but prolongs the duration of the run, especially if the boiler is small.
Gauges
Pressure gauges shows
how much
pressure is present. These are little analog dials, pretty easy to
draw, and doesn't have much variety. They are basically sensors for
pressure within the boiler, or how much is feeding though etc.
Insulation
Insulation is most
commonly found with
marine applications. Insulation is just ways of trying to minimize heat loss. These can be applied to boilers, pipes,
and cylinders. Wood lagging is the
coolest looking, and I draw them often, they just give it a old tech
look and feel. Of course modern insulation can be used, almost anything
that can retain heat. Pipes are often covered with rope or coated with
a white substance, in which I have no idea what it is made of :)
Gears
Gears, lots and lots of
them. Small
engines needs to be geared down quite a bit. Lots of gears just looks
cool anyway, but make sure that you are gearing down by drawing little
gears to big gears. Old gears are usually spoked, sometimes curved
spokes. High pressure can drive pistons straight to wheels, as with
locomotives.
Sprocket/Chain
Sprockets and
chains are good for
driving something far from the engine. They are also more forgiving
than gears, as they don't need to be exactly right on to work ( I use
lots of it in my steambots). However, sprockets and chains are easier
to fail, they can derail.
Linkages There are a variety of
linkages....
for a drawing to be convincing, they just need to look right, not
really work right. To make
linkages look right, you need to put in some
thought, especially the if the linkage is big and a focal point.
Linkages
basically just transfer circular motion to something else :) The
master of linkages can be found at mechanicalspider.com
Levers
Levers can control a lot of things.
Clutches, engaging and disengaging gears, steam flow, etc. Draw lots
of them for the operator.... remember, just make them look right, don't
worry about what each lever might do.
Whistles
Steam whistles are attached to boilers, or at least some
piping
coming off the boiler. Steam is forced through it via some sort of a
lever (often a pull chain type) and makes that classic steam whistle.
The bigger it is, the deeper it sounds, but the more steam is used up.
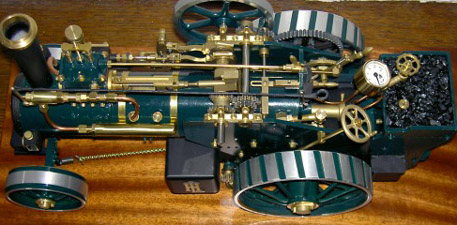
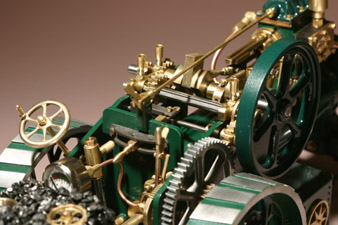
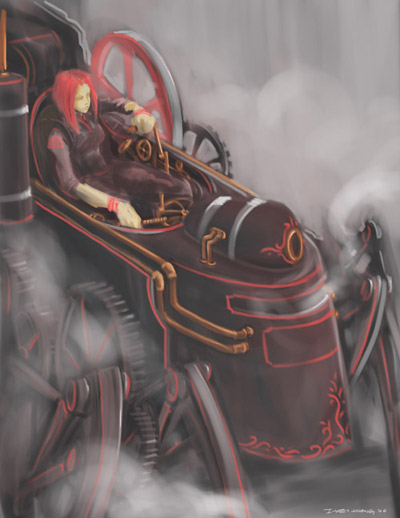
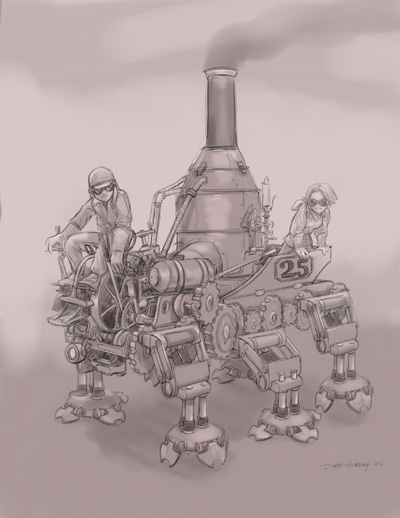
Examples of some amazing scale traction engine:
Ok
so now I know each component, where do I start?
Remember the basic
shapes and design of the
parts above (most everything is cylindrical in shape). Surf up each
part above, and collect images of
components, as well as old steam locomotives &
vehicles for reference.
Once you are familiar with the parts, you can then
free sketch at will, but always use the references to keep it
authentic and believable.
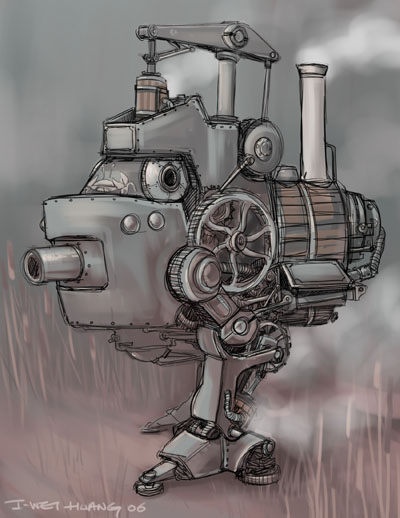
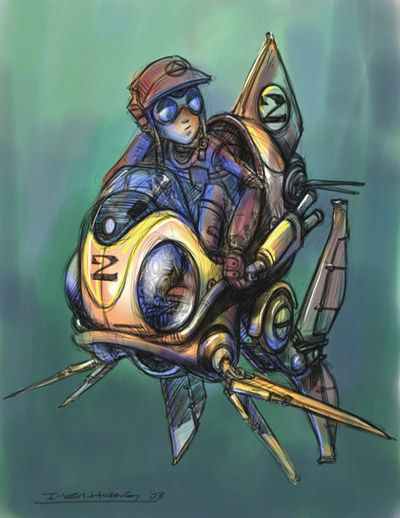
Fist, come up with
ideas. Plan
out what you want it to be, a biped robot? a car? a tank? a multi
legged walking machine? Don't under estimate "character". Add
some
personality or character to you machines, even if it is inanimate. The
#1 goal should be a well
designed, balanced, and eye catching machine. Worry about how it
works after you have some rough sketches and shapes of something
compelling, otherwise it's not worth the effort. I can't stress this
point enough.
Work loose first, even
if you decide the finish project will be detailed and well rendered. I
usually prefer the loose and lazy way, just flop it down and call it
good, as long as you get the feeling and idea across, you don't always
need to
carefully draw out each teeth of a gear - the human mind is really good
at connecting and making sense of just a couple of lines. However, you
can go as detail as you like, it is only a stylistic choice.
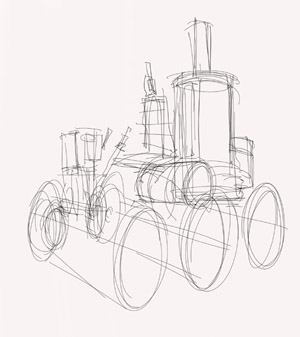
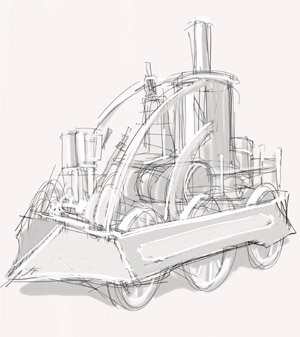
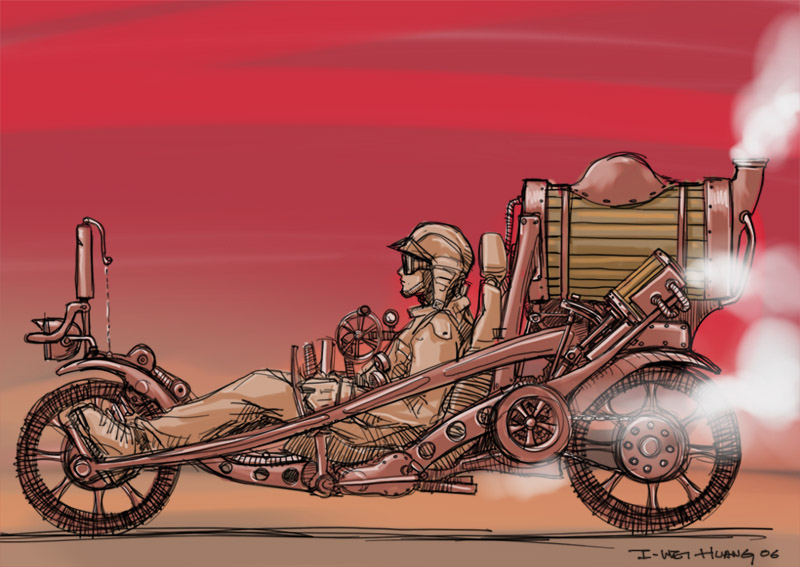
For the purposes of demonstration, I have provided simple mechanics, of
a wheeled steam machine below. What is it? heck if I know....
Lay out the
boiler first as it is the
biggest, and heaviest part. Pay attention to weight and center of
gravity. Boilers are filled with water, and well constructed, therefore
they are very heavy. They can be vertical, horizontal, or even at an
angle. Make room for some sort of a firebox or burner. Whatever chassis
you have, should support the weight of
something really heavy. Next, draw up some cylinders.... almost
everything on steampunk machines are cylindrical in shape.... from
gears, condensers, fuel tank, water reservoir, shafts, axles etc....
Learn how to draw cylinders in all angles, it comes in handy. Next,
draw up main axles, provide
where power needs to be directed to for locomotion.
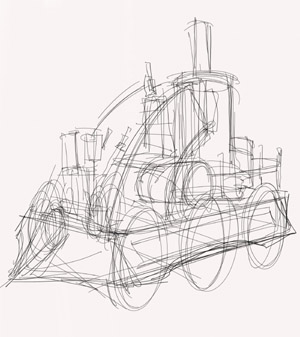
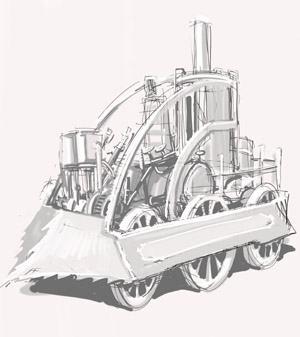
Then decide where to lay out
the
engine(s). Engines can be at any angle, they function just fine however
they are positioned.Lay out some gears or
sprocket/chains that will be visible. The pistons must power directly
to the main drive shaft, or
geared to it. The easiest is to just make the piston shaft in the same
direction as the drive shaft, however, you can route it however you
want using beveled gears (i.e. 90 degree from engine to axle)
Work out the
locomotion.... if you get confused
about how something works (as I often do) you can cover it up with body
work. However, I think the compelling part of steampunk is in how open
and simple
things are, so I like showing all of the mechanisms as much as
possible.
Design out the body work,
try to keep the old tech feel. At this point you can cover up any
mechanical detail that you can't, or are too lazy to figure out :)
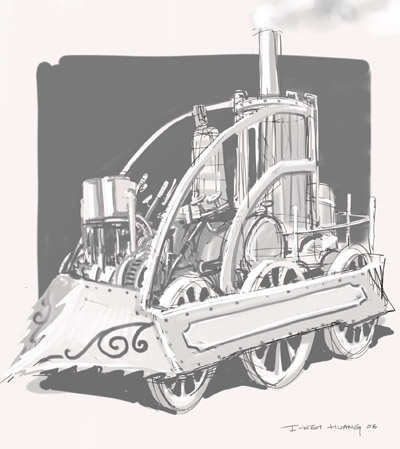
Lay
down basic shading or color,
working out shapes and define planes & edges as you go
Add strong shadow and
shading.
Add accents such as
Victorian inspired scroll work, rivets etc. As well as add detail with
valves, levers etc.
Final design:
If you decide to add color,
surf up old steam trains, and steam
traction engines. They
often are black, but not always. Accents in brass, copper, or gold, as
well as colors of maroon, dark green, or blue. Check out Victorian
scroll work, they can make a machine look very elegant and ornate.
One last comment about
design...
You have to pay
attention to the limitations of simple
mechanics, usually a single boiler can power one or two engines. Unlike
electronic motorized
robots, where you have the luxury of having a motor per joint, and
electronic / computer controlled on how and when each motor runs.
Even if you have lots of engines, powering each joint, you are still
limited to having no electronics to control how each one operates (if
you wish to stay totally low tech steampunk). The best way is to limit
the number of engines, and use linkages to transfer from circular
motion to a.... say.... walking motion. Don't go hollywood on me folks,
I think a good steampunk design
is in part looking really dorky, or really stupid. When you try to make
them
too cool, then you loose that steampunk flavor :)
So that's it....
hope that this can be
an inspiration for you to tackle on some steampunk sketches.
Special
thanks to cedesign for
letting
me steal some pictures from his impressive and beautiful collection of model steam
engines.


 Without going into
steam
engines in
detail, here are the basics of how to draw them. Draw a cylinder,
(piston is inside and not visible). Shapes is basically a big cylinder
with a small
long cylinder coming out of it. Steam is piped through the cylinder to
push
the piston in and out. If it is double
acting (pushes both in and out) then it usually contains a box like
shape on
the cylinder. This is for another link connected to the shaft to open
and close valves to allow the steam to fed though each end of the
cylinder - pushes piston out, and pushes in when it gets to the end of
the travel. So to put it simply, cylinder, with a box on the side.
Without going into
steam
engines in
detail, here are the basics of how to draw them. Draw a cylinder,
(piston is inside and not visible). Shapes is basically a big cylinder
with a small
long cylinder coming out of it. Steam is piped through the cylinder to
push
the piston in and out. If it is double
acting (pushes both in and out) then it usually contains a box like
shape on
the cylinder. This is for another link connected to the shaft to open
and close valves to allow the steam to fed though each end of the
cylinder - pushes piston out, and pushes in when it gets to the end of
the travel. So to put it simply, cylinder, with a box on the side.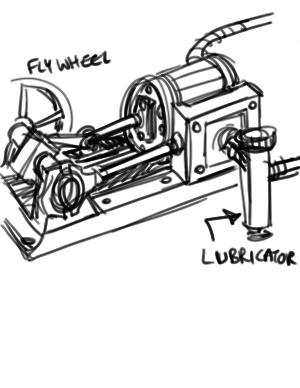 Oiler/ displacement lubricator
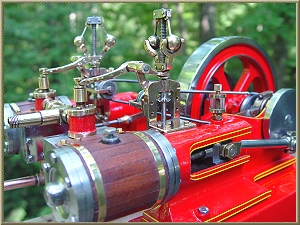 Governor
 Valves
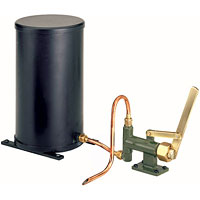 Water
Sight
Glass
Water
Sight
Glass Insulation
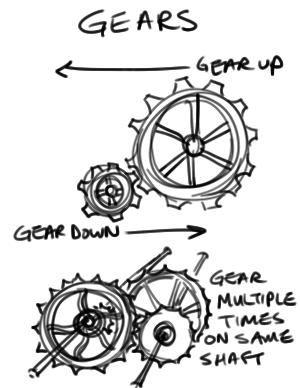 Gears
Gears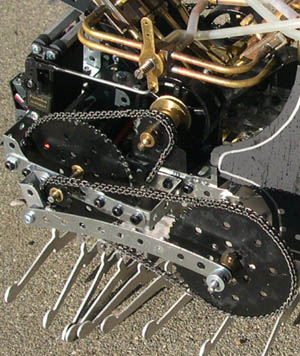 Linkages